


In his latest article, ELT pronunciation expert Adrian Underhill looks at monophthongs and how mime, gesture and inner imaging can benefit both your teaching and your students’ learning.
Monophthongs, diphthongs and consonants on the phonetic chart
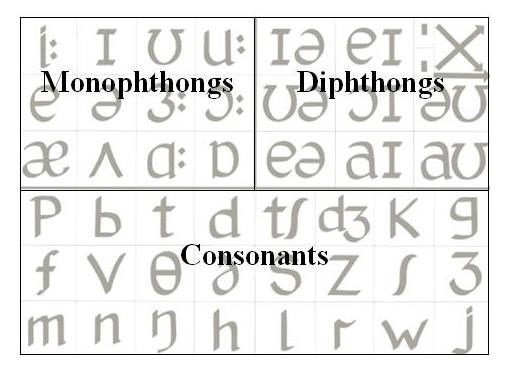
What are monophthongs?
(From the Greek: mono = single, phthong = sound. You can pronounce it /ˈmɒnəfθɒŋ/ or /ˈmɒnəθɒŋ/.)
Monophthongs are pure vowel sounds and have no restriction to the air through the mouth. The sound of each vowel is made by the shape and volume of the space in the mouth, which is shaped by the tongue, the lips and the jaw.
There are 12 monophthong vowels in British English. They each consist of a single voiced sound, like /æ/ as in hat, or /ʊ/ as incook. The speaker can make any monophthong longer or shorter, but the five English vowels /iː uː ɜː ɔː ɑː/ are typically longer than the others. This is shown on the chart by the length symbol /ː/.
How do you make monophthongs?
You make a vowel with the position and shape of your tongue, lips and jaw. Learning the new vowels of L2 is easier if we re-connect with the muscles that make the difference – the muscles of lips, tongue and jaw. I find it helpful to think of these as three ‘muscle buttons’ that our learners (and us teachers) need to locate to be able to make sounds outside our L1. So, here are the three ‘muscle buttons’:
- Lips (spreading and bringing back, or rounding and pushing forward)
- Tongue (moving forward and back)
- Jaw + tongue (moving them up and down)
How to help your learners to find the three ‘muscle buttons’
1. Lips
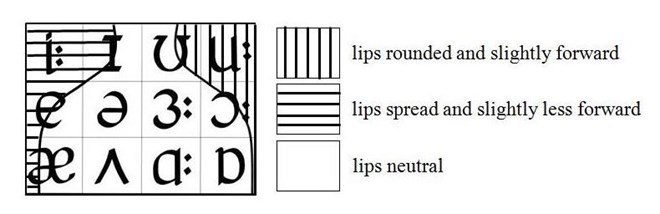
Help students become aware of the muscles that control the spreading and rounding of the lips. First establish the two sounds /i:/ and /u:/. Now slide slowly from the first to the second and back: /i: … u: … i: … u: …/. Notice the lips becoming spread for /i:/ and rounded for /u:/.
See this demonstrated here.
lip position superimposed on the monophthong chart
2. Tongue
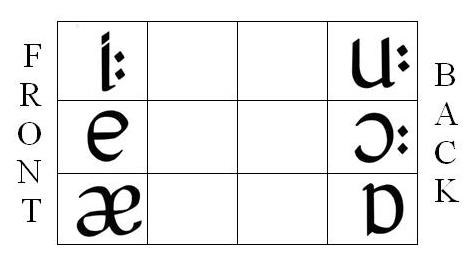
Help students become aware of the muscles that move the tongue forward and back. Have them slide slowly between the sounds /i: … u: … i: … u: …/ and, as they do so, to feel the tongue going back and forward in the mouth. Demonstrate this first.
See this demonstrated here.
front and back monophthongs
3. Jaw
Help students become aware of the muscles that move the jaw up and down. Have the learners slide slowly between the sounds /i:/ and /æ/. If you put your forefinger on the bridge of your nose and your thumb on the point of your chin you will feel your jaw open as you slide from /i: … æ/.
See this demonstrated here.
Four learning activities for monophthongs: mime, gesture, inner imaging and dynamic vowel pairs.
1. Mime
Mime means demonstrating the lip, tongue and jaw position of the vowel so that the learners can see it visually and respond to the physical aspect.
A mime should be:
- Silent, so that learners focus on the muscle movement. If you saythe sound you can divert learners away from the physicality and back to listening to the model. So at first keep watching and listening separate.
- Slightly theatrical, playful, humorous, perhaps a little exaggerated.
Mime works bestfor sounds that are more visible, like front vowels:
/iː/ lips spread
/e/ lips slightly spread and jaw a bit open
/æ/ lips slightly spread and jaw open
And back vowels:
/uː/ lips rounded and jaw fairly closed
/ɔː/ lips rounded, jaw mid open
/ɒ/ lips rounded, jaw more open
Mime is very useful for all vowels. To see it demonstrated click here and select the vowel you are interested in from videos 7–23.
2. Gesture
Gesture means using hand movements to give information about producing the sound. Gesture can give information about the vowel that mime does not convey, such as length, shortness, amount of energy, a strong or relaxed posture, lips spread or rounded, jaw high or low, tongue position.
See this demonstrated here.
Remember to use gesture and mime together.
I generally use a two-step procedure for introducing or practising individual sounds:
- I use mime and gesture together (no sound) and see what students can produce.
- Then I say the sound myself using the inner imaging process below.
3. Inner imaging
This is more creative and memorable than repeating after the teacher. See if you agree.
- Teacher says the sound aloud once(perhaps /ɔː/) while students listen. Teacher doesn’t repeat it. Students do not repeat aloud either.
- Students listen to it a few times internallyin their inner ear. The internal repetition comes from each student’s own inner audio loop.
- After 2–3 seconds ask them to say it aloud. They will be surprised at how well they can say it.
- Then invite individual students to say the sound, while the whole class listen to the difference between different students. The aim is not just to spot the ‘correct’ one and reject the others, but to notice and enjoy the differences. This helps reduce embarrassment and increase confidence.
See this demonstrated here.
4. Dynamic vowel pairs
Practising static pairs of vowels is useful. Practice these vowels and sample words on their own:
- bed /bed/ v bird /bɜːd/
- bird /bɜːd/ v bored /bɔːd/
However, exercises become more powerful if you connect the two vowels with a dynamic slide, from one vowel to the other and back, several times, making sure to hear the in-between sounds produced during the movement of the muscles from one position to the other.
- /e … ɜː … e … ɜː/ Notice how the jaw stays at the same openness, and how with the second vowel the tongue moves back slightly and the lips become a little neutral
- /ɜː … ɔː … ɜː … ɔː/ Notice how the jaw stays at the same openness, and for the second vowel the tongue moves back while the lips move forward and become rounded.
The learning value of all activities is enhanced when you pay attention to two things:
- Sensing which muscles you are moving and how much effort you are using.
- Listening to the small changes in the acoustic vowel sound that these muscular changes produce.
Pronunciation brings language to life and life to language!
Resources
For short articles on how to form, practise and correct individual monophthong vowels read ‘The Story of Sounds: Episodes 14 – 26’. Each episode focuses on one monophthong:
https://adrianpronchart.wordpress.com/category/the-story-of-sounds/
To watch videos about what’s happening in the mouth and some mimes and gestures you can use, go here and select from videos 7–23 (all about 3 minutes long).
In Sound Foundations (Macmillan, 2005) you can find:
- A full description of understanding and teaching monophthongs with diagrams pp 2–22.
- A full description of using mime, gesture and inner imaging pp 110–121.
Pronunciation skills with Adrian Underhill

We’ve brought together a series of videos and articles starring and authored by our ELT pronunciation expert Adrian Underhill and partnered them up with some tips and activities.
- 1
- 2
- 3
- 4
- 5
- 6
- 7
- 8
- 9
- Currently reading
Pronunciation skills: Monophthongs: Using mime, gesture and inner imaging
- 11
- 12
- 13
- 14
- 15
- 16
- 17


No comments yet