


In the latest instalment of the Tech Tasks series, Tom Walton looks at mobile phones as an educational resource, exploring how students can use them to improve their English by creating video and audio content both inside and outside the classroom.
In the first part of this article, we looked at how we can get our students to use their smartphones to create images. Now, we’re going to look at how they can also use them to create audio (aka podcasting) and video.
Podcasting: creating and sharing audio files
Podcasting essentially involves creating an audio file and sharing it online with an audience of listeners and subscribers. There are lots of possible tools, but among the simplest and best is the free app Spreaker Studio. It allows the user to record on a smartphone and then share (and comment) on Spreaker.com.
No other equipment is needed, though you (and your students) could also easily ‘embed’ (i.e. insert) the audio file from Spreaker onto a blog.
Sharing video
If you want your students to share and be able to rewatch the videos and/or comment on them, uploading to YouTube is the easiest thing to do. You can keep them private if necessary.
An easy alternative is to store them in a shared Google Drive folder, which can also be entirely private. You can then access the videos in the classroom and watch them and discuss them.
Alternatively, your students can also upload up to 15 seconds of video to Instagram (now that’s a fun challenge!), but we’ll be looking at Instagram in a separate article.
Five simple ideas adaptable for many levels
1 A first podcasting task
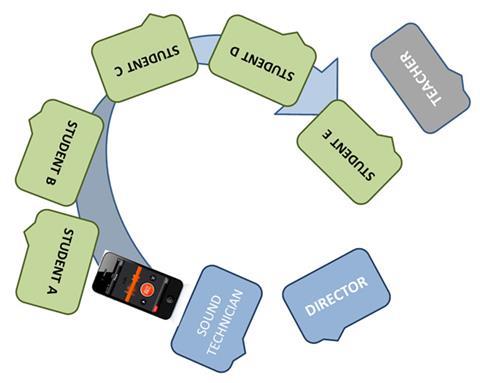
For your first podcasting task, I recommend having four or five students each say a single sentence and record the whole thing as a single audio file – as illustrated to the right. An opinion on a topical issue (possibly one in your course book…) or a definition of something (e.g. ‘love’, ‘success’…) works well.
At low levels, you can still do this, but you might want to use ‘likes’ rather than ‘opinions’, so each student is simply saying, ‘I like skiing,’ or, ‘I love dancing,’ or something equally simply. With young learners, it’s fun to get them to include the animal noise: ‘I like cats: miaaaoww!’
Note: you should allow time for preparation, organization (who is going to say what, in what order…) and rehearsal. This is, if anything, more important than the actual recording!
Each student just saying a single sentence has the advantages of (a) familiarizing the students quickly and simply with the tools to be used and (b) getting them over the initial embarrassment of hearing their own recorded voice – they’re saying something very short, and they’re not saying it on their own!
Anyone who doesn’t want to be recorded can be the director or sound technician (i.e. the person actually making the recording), as shown in the diagram.
2 A more complex podcasting task
Once your students are familiar with the tools, you have can them record longer, more complex things, possibly on their own. I still prefer them to keep the recordings short, however (they get a bit boring to listen to otherwise, and we want the other students to listen and respond to the recordings!).
For levels B2 and above, there’s a wonderful BBC podcast, 60 Second Idea to Improve the World, a format you could imitate. The BBC podcast includes the 60 second idea (it truly does last only 60 seconds!) and then a panel discussion in the same audio file. With students, I suggest you just include the 60 second idea, and have discussion of it either (a) via the comments, if you’re using a digital space like those suggested in Part 1 of this article, or (b) face-to-face in class.
Note that the BBC format requires exactly 60 seconds. You could require that (it’s brilliant for getting the students to rehearse it repeatedly to get it perfect!), or be less strict – provided it’s 60 seconds or less.
Again, I think this works best if you put your students in small groups, in which they can choose who is going to do what. It’s not necessary for everyone to speak and be recorded.
If improving the world seems over-ambitious, try improving your city – or school, or the rules of football!
3 A regular podcast programme
A podcast really ought to be a regular programme, perhaps on a weekly basis, rather than just a single audio file.
If podcasting proves a popular activity with your students (and I think you’ll find it will!), it’s great to have a different small group each week take it in turns to produce the week’s podcast. If they keep the podcast short (say, under two minutes) and include a single question on a topical issue, along with their opinion on it, the rest of the class can then use the comments to answer the question and discuss the issue. If you get them to pick a topic that has come up in class and/or in your coursebook, it makes a great way to recycle language.
Remember that you don’t just want to record an audio file, you want to get everyone to use as much language as possible!
For lots more ideas on podcasting, see this article in the Tech Tools series.
4 Videoing what we eat for breakfast
There’s really no limit to what your students could film on their phones (and you will find some amazing short films filmed entirely on smartphones, like this one, for example. But ‘what we eat for breakfast’ makes a nice short, simple, collaborative project to start off with.
All your students have to do is film and describe exactly what they have for breakfast on one day. I’d again suggest a 60 second time limit for that. They then need to share it with everyone else (see below) and their classmates should comment (and we might make ‘how healthy what we’re eating is’ into a topic of debate). Having the students nominate ‘Oscars’ for ‘Best Video’, ‘Best Cooked Breakfast’, etc, is also fun and can produce quite a lot of language.
At a low level (say, A2 or below), that might be all you do, but at higher levels, you might want to make the video part of a larger project on health, perhaps with research and writing reports and making presentations.
If your school has an exchange with students in another country, this makes a great shared project. I once did the project with people in India and discovered some of the amazing things they have for breakfast!
5 Videoing presentations given in class
One of my favourite activities is having students give presentations to the rest of the class. I like to provide lots of help beforehand and feedback afterwards (and your students could also film the latter!). Being able to film the presentation is a wonderful way to take advantage of smartphones: the presenter(s) can then watch themselves: If they do that, your feedback is much easier to comprehend.
What I recommend is have a classmate record on the presenter’s phone. If that happens, then the presenter can take it away; we don’t necessarily share it (especially if it didn’t go that well), and it can be re-watched at their leisure.
THINGS TO NOTE
To get the most out of these ideas, I suggest the following tips:
- Your students can get so much more language practice if you ask them to brainstorm and rehearse and have someone playing the role of ‘director’ – that is especially true at higher levels.
- Don’t let your students waste time editing audio or video. Instead, get them to rehearse and re-rehearse and, if necessary, re-record. There are tools that permit editing, but we’re in class to play with language, not with technology!
- Classrooms can be terrible places for recording audio and video – because there’s so much background noise. You can try having groups record one by one outside in the corridor, or, alternatively, use your classroom time for rehearsal but have the students record outside class hours.
- If you’re using a blog, or Edmodo, or Spreaker.com, you can also obtain more language practice by getting your students to go there and comment on what their peers have posted. You need to insist that they do that, otherwise our students post things which may be great, but which – rather sadly – no one else seems to care about!
- See also the FAQs in Part 1 of this article.
MORE IDEAS FOR USING MOBILE PHONES
You’ll find more things that can be done with mobile phones in our section on Mobile English.
If you’ve tried these or other things with your students, we’d love to hear about them in the comments!
Tech Tasks for the Class

The Tech Tasks series lists ideas and fun tasks to do with your students using the latest digital technologies.
- 1
- 2
- 3
- 4
- 5
- Currently reading
Tech Tasks: Using mobile phones for images, audio and video (Part 2)
- 7
- 8
- 9
- 10


No comments yet