


In his latest article, ELT pronunciation expert Adrian Underhill looks at diphthongs and how sliding and putting sounds together can benefit both your teaching and your students’ learning.
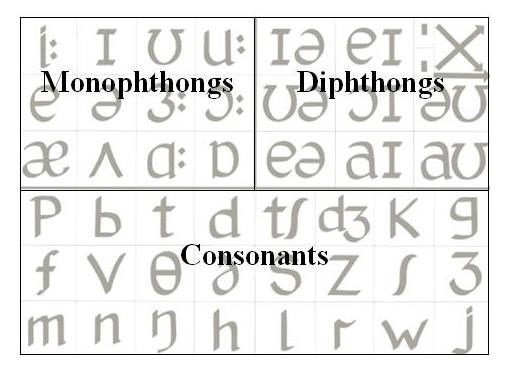
Monophthongs, diphthongs and consonants on the phonetic chart
What are diphthongs?
From Greek di = double, phthong = sound. You can pronounce it /ˈdifθɒŋ/ or /ˈdipθɒŋ/
Diphthongs consist of two vowels joined together by gliding from the first vowel to the second. This combination of two sounds forms a single phoneme, which typically has a duration similar to the length of a long vowel (depending on context or speaker for example). The two vowels which make up a diphthong already exist as monophthongs (single sounds) on their own. The first sound (first element) of a diphthong tends to be more prominent than the second.
You can see from the chart the diphthongs are in the top right of the chart; they incorporate the same symbols as the monophthongs on the left. There is one exception which I’ll mention in the footnote below.
There are eight diphthongs in Standard British English:
| Two finish with /ʊ/: | Three finish with /ɪ/: | Three finish with /ǝ/: |
|---|---|---|
|
/ǝʊ/ (as in hope) /aʊ/ (as in town)
|
/eɪ/ (as in paid) /ɔɪ/ (as in boy) /aɪ/ (as in time)
|
/ɪǝ/ (as in here) /ʊǝ/ (as in sure) /eǝ/ (as in hair)
|
Three techniques for teaching diphthongs
There are three techniques for teaching diphthongs which may be new to you: ‘sliding’, ‘miming’ and ‘inner imaging’.
Sliding
The learners say the first vowel /ǝ/ and slide slowly to the second vowel /ʊ/. This means attempting the diphthong in slow motion and making the in-between sounds as well. ‘Sliding’ draws attention to the two-sound nature of diphthongs, and helps leaners notice the muscular movement of tongue, lips and jaw. It gives students a way to build diphthongs from the component monophthongs, which they already know. So you don’t have to teach, but help them to build – this is fun to do.
Miming
Mime works well for diphthongs because the slide from first to second vowel involves a strong physical – and therefore visible – movement. Mime is an excellent way to help learners explore and discover for themselves what to do in their mouths; it gives physical clues which lead to experimentation, rather than you simply saying the sound aloud, which leads to copying. Mime shows lip and jaw movements, and to some extent tongue position. I also use gesture to support the mime and to highlight length and tongue position.
Inner imaging
This requires leaners to use the inner ear, and to process the sound internally before trying to say it aloud through the muscles, which are conditioned to L1 sounds. If learners hear the new sound internally it creates a strong impression; then when they say it aloud they can hear the difference between what they say and the internal representation – and they can have another go. After a moment you can offer to say the new diphthong once again, and again they should initially remain silent while they continue to hear it internally. And this time they will listen to it slightly differently since they already know something about it. I think this is more powerful, creative and memorable than a simple straight repetition after the teacher.
A sequence for teaching diphthongs
Here is the teaching sequence I use for diphthongs. Adapt this and make your own variations:
Identify and revise the two component monophthongs
- Select the diphthong, for example /ǝʊ/ as in hope.
- Identify the component monophthongs, in this case /ǝ/ and /ʊ/.
- Find them in the monophthong section of the chart, and practise the two sounds separately as monophthongs with your class for a moment. For example you might point at /ǝ/ on the chart, and the students say it, then the same with /ʊ/.
- Do any repair work needed.
- Then you might say one of the two and a student has to point at the correct one.
- Then a student might say one of them and another student point at it, and so on, until the class is ready for step 2.
Slide the two monophthongs together
- Now slowly slide the pointer from /ǝ/ to /ʊ/ on the left side of the chart, and have students say the first sound and gradually change it to the second. Make sure they go really slowly so they see what they are doing with their tongue, lips, jaw. Have them go at the speed of the pointer.
- Then mould the diphthong into shape a bit, by having the learners emphasise the first element slightly, and by making sure that they arrive fully at the second element, so that we hear it, albeit briefly. When they have the new sound /ǝʊ/ , then you can speed it up.
- When they can make the sound pretty well, ask them to look on the top right side of the chart, in the diphthong section, and tell you where to locate the sound they have just made. They may guess for a bit, but when someone gets it can come up to the chart and point at the /ǝʊ/ symbol.
- Get the learner to point at the diphthong; the class should respond by saying it. Then the learner points at the two component monophthongs, and again the class responds by saying them separately.
At this stage the class have made the diphthong without hearing the teacher. They will hear me say it in a moment at step 4, but I want them to try to find it without copying me. You can use the same approach for all eight diphthongs.
A first practice using mime
Mime the vowel, for example /ǝʊ/, making it slightly slower and making the movements clear but not exaggerated. Do the same with a few others diphthongs. Have the students try it both silently and aloud. Now invite a student to the chart to point at the diphthong that you are miming. See if the class agrees. Do the same for other diphthongs. Play with this until the class gets the hang of being able to ‘lip read’ diphthongs.
Using inner imaging
- Invite students to listen carefully while saying the diphthong aloud once only (perhaps /eɪ/), while students listen.
- Don’t repeat it. The learners shouldn’t repeat it aloud either. Instead they should listen to it a few times internally in their inner ear.
- After a couple of seconds, ask the learners to say it aloud.
- Then invite a few individuals to say the sound, and invite the whole class to listen to the differences between them.
Every attempt is of interest. We are inviting exploration, rather than immediate correctness. Gradually you identify and select the intended diphthong, and keep pointing it out on the chart.
Resources
You can watch these four steps demonstrated and explained in three videos, each about three minutes long:
Pronunciation Skills: Diphthongs part 1 /eɪ/ and /ǝʊ/
Pronunciation Skills: Diphthongs part 2 /ɔɪ/ /aɪ/ and /aʊ
Pronunciation Skills: Diphthongs part 3 Exploiting the visibility of diphthongs
Diphthongs are to be enjoyed! They are much easier than many people think, because they are visible and physical and have the characteristic slide between two vowel sounds.
Footnote
The symbol /aʊ/ (as in town) is composed of /a/ and /ʊ/ but /a/ does not appear as a separate monophthong on the left of the chart. So I use /ʌ/ as the starting point for the glide /aʊ/. I make the diphthong like this: /ʌʊ/. It functions just the same.
I do the same thing with the diphthong /aɪ/ time. So I slide from /ʌ/ to /ɪ/ making the diphthong like this /ʌɪ/.
Phoneticians (not me!) designing the International Phonetic Alphabet chose the symbol /a/ as the starting point for /aɪ/ high, and /aʊ/ how. In my view, the difference between /a/ and /ʌ/ is phonetic, and not phonemic, and therefore of interest to language scientists not to language learners and teachers.
Pronunciation skills with Adrian Underhill

We’ve brought together a series of videos and articles starring and authored by our ELT pronunciation expert Adrian Underhill and partnered them up with some tips and activities.
- 1
- 2
- 3
- 4
- 5
- 6
- 7
- 8
- Currently reading
Pronunciation skills: Diphthongs – Sliding and putting sounds together
- 10
- 11
- 12
- 13
- 14
- 15
- 16
- 17


No comments yet