

This article looks at different ways of using the phonemic chart with your students. It presents reasons why it is useful for students to know the phonemic alphabet, and gives a few practical ideas to help teachers use the phonemic chart in their lessons.
Introduction
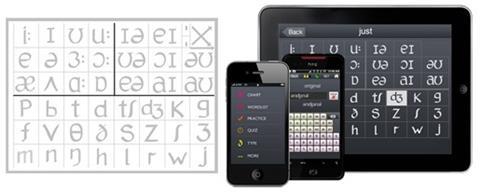
Many students have problems with the pronunciation of sounds in particular words. One issue is that English is not a phonetic language, so looking at the written word will often not help the students when it comes to speaking and pronunciation. In order to help our students, teachers often write the words using the phonemic alphabet so that students can see how the word should be pronounced, but this relies on the students knowing the phonemic alphabet and the sounds that correspond to the different symbols. Sometimes teachers ask me how they can teach their students the phonemic alphabet, so what follows are a few ideas. All are based on using the interactive phonemic chart available to download from onestopenglish: https://www.onestopenglish.com/pronunciation/interactive-phonemic-chart-british-english/156649.article
Starting off /stɑ:tɪŋ ɒf/
There are 44 phonemes (see the Glossary at the end of the article for definitions of some of the key terminology used) in ‘standard’ English. These are broken down into 12 vowel sounds, eight diphthongs and 24 consonants. As you can see already, there are more phonemes than there are letters in the English alphabet (26 letters, but 44 phonemes).
The starting point is helping students to become familiar with the symbols used and the sounds they represent. It is important that students realize that the symbols represent sounds and not letters, despite the fact that many take the same form, i.e. /b/, /f/, /m/, etc. One way to make this clear is by writing up /sed/ and /saɪd/ on the left hand side of your board and the words said and side on the right hand side. Ask the students to match the phonemic script to the correct words and get the students to notice that the word said is written as /sed/ in phonemic script.
Familiarization
It is a good idea to start by introducing sounds where the symbols are identical or close to the letters of the alphabet in English. The last thing you want to do is frighten your students before they’ve had a chance to realize that the phonemic alphabet is something that will be useful to them and not something that is difficult to learn. Remember that you are introducing sounds and not letters so, for example /m/ is pronounced as one sound and not in the way we say the letter m in the alphabet – /em/. Here is a quick team game to practise and check that the students can say the sounds correctly:
- Sound race: Divide the board in half and write up the phonemes on both halves but in a random order. Put the students in teams and get them to stand in a line facing the board. Say a sound, i.e. /p/, and ask the two students at the front of the line to run up to the board and point to the correct sound. Then, ask the student who points to the sound first to say it. Award a point to the student who points and says the sound correctly. Continue the game by saying another sound and having the next two students in the line run up and point to the sound and say it. Repeat the process with the other sounds.
New symbols
There are likely to be symbols that are not familiar to your students (unless they have worked with phonemic script before), such as /θ/, /ð/, /ʧ/, /ʤ/, /ʃ/, /Ʒ/ and /ŋ/. Some of these may also represent sounds that are quite difficult for your students to make, depending on their L1. If you think the sounds will be hard, start off by choosing three or four and leave the rest for the next lesson.
Begin by pointing to the symbol and saying the sound, i.e. /ʧ/. Get the students to repeat the sounds, but don’t say any words yet. Repeat the process with the other sounds you have chosen, i.e. /ʤ/, /ʃ/ and /Ʒ/. The following is a game which can be played to practise and check that the students can distinguish the sounds when they hear them:
- Hold up the card: Give each student a set of flashcards with a phonemic symbol written on each one. Say one of the sounds, i.e. /ʧ/, and get the students to hold up the card they think represents the sound you said. Once everyone is holding up the correct card say the sound again and get the students to repeat it. Repeat the process with the other sounds, occasionally saying a sound you have already said to keep the students focussed.
Moving on to vowels
The interactive phonemic chart on onestopenglish is extremely useful here as it gives clear audio examples of the English phoneme set.
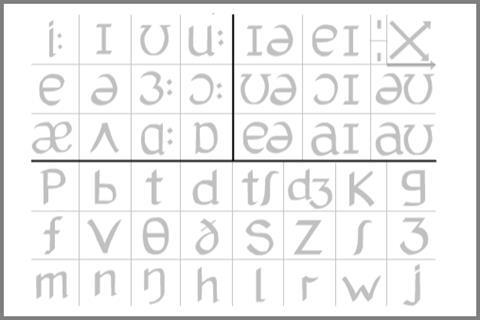
The sounds depicted by the symbols on the far left are produced at the front of your mouth. The lips are usually wide, i.e. /i:/ is made with your lips almost in a smile. Try getting the students to say /ʧi:z/ (cheese) or /pli:z/ (please).
The sounds on the far right are made at the back of your mouth and require your lips to be narrow (or pursed), i.e. /tu:/ (two). Try getting the students to say the four sounds in the top row starting with /i:/ then moving to /ɪ/, then /ʊ/ and finally /u:/. See if the students notice what happens to their lips. You might also want to point out that the /:/ after a symbol indicates that the sound is long, i.e. /i:/ is long and /ɪ/ is short. You can almost glide from one sound to the next simply by adjusting your lips.
Now, have a look at what happens to the sounds if you move from the top row down to the third row, i.e. from /i:/ to /e/ and then to /æ/. Again, say each sound and get the students to repeat. What do they notice about the shape of their mouth? The lips are spread wide, but at the start the lips are close together. As you move down the mouth opens wider (downwards). You could repeat this with any set of vowels in the same column, i.e. /ʊ/, /ɜ:/ and /ɑ:/, and the same thing will happen. Thus, the layout of the chart gives a visual representation of how and where the sound is produced in the mouth to help the students articulate each one correctly.
Dipthongs
Although there are only eight diphthongs they often cause the most trouble! The main issue here is that you are gliding from one vowel sound to another within a syllable. So, for example, the sound /eɪ/ (as in make) is made by gliding from /e/ to /ɪ/ to produce a new sound. The best way to get students to produce the diphthongs accurately is to get them to make the separate sounds individually first and then say them again, but this time joining them together by gliding from the first individual sound to the next.
Another problem with the diphthongs is how similar some of them look, i.e. /əʊ/ and /aʊ/. A good idea to distinguish between these is to write up some minimal pairs on the board and get the students to say each word in turn, i.e. no/now, toe/town, grow/ground, etc. Given below are two examples of games which you can play to help practise these, and other, sounds:
- Correct the teacher: On the board write up a list of minimal pairs that contain the two sounds you wish to practise. Choose a student and ask them to say one of the words. Point to the one you hear them say. If you point to the one they chose, they can say ‘Yes’. However, if you point to the wrong one (because of their pronunciation) they can say ‘No’ and try saying it again until they say it correctly and you point to the word they wanted. By doing it this way, part of the blame becomes the teacher’s and students don’t feel it is only them getting things wrong. Here is an example list: here/hair, beer/bear, fear/fair, cheer/chair, these/theirs.
- Snap: Make two sets of cards: one set with phonemic symbols on and the other set with words (with the particular sound you want to focus on underlined). Make enough copies of the cards so that you have a set between two to four students. Students put the cards in two piles (phonemic symbols in one pile and word cards in the other). Students then take turns to turn over the top card from each pile. If the two cards match, i.e. the symbol is the same as the underlined sound in the word, they should say ‘snap’. Whoever says ‘snap’ correctly first, wins a point.
Putting it all together
Having worked slowly and systematically through the sounds, the next step is to take a look at the complete phonemic chart. This can be quite daunting and it is important to remind students that they have already been introduced to many of the symbols and the corresponding sounds.
To begin with, divide your class into groups and give each group a copy of the phonemic chart and an envelope containing a set of words with the sounds underlined. It’s a good idea to use the words that are given as examples on the interactive version on onestopenglish, i.e. see, sit, good, two, egg, away, pleasure, she, chair, just, yes, etc. The students then match each word with the correct symbol on the chart. Once they’ve completed the chart you can check the pronunciation and drill any that students are still having problems with. In subsequent lessons you can use the chart to practise a few of the sounds that cause problems for your students.
In the past, using the phonemic chart has had its limitations as there has been no sound function connected to the chart unless provided by a separate tape or CD. However, with the downloadable interactive version on onestopenglish, one of the key features is the link between the chart and the audio. You could use the chart on an interactive whiteboard pointing to particular symbols, getting the students to listen to the sound and then asking them to repeat the sound (and word). Alternatively, students could use the resource for self-study, practising particular sounds that they find difficult. And finally, for teachers it is a wonderful resource giving you the opportunity to brush up on your knowledge of the phonemic alphabet and gain the extra confidence you might need prior to using it in your lessons.
Glossary and bibliography
- Phoneme: The smallest element of meaning-changing sound in a word. For example, there are three phonemes in the word cat: /k/, /æ/ and /t/. If we change the middle sound /æ/ to /ʌ/, then we have the word cut.
- Vowels: In English there are five vowels: a, e, i, o and u (but twelve vowel sounds, i.e. /ɪ/ and /i:/).
- Diphthongs: Sometimes in English two vowel sounds are connected and there is a ‘glide’ between the two, creating a new sound, i.e. /ɔɪ/ as in boy or /aʊ/ as in now.
- Consonants: these are letters such as b, p and v. Again, like vowels, there are more sounds than there are letters. Some sounds correspond exactly with a letter, i.e. /p/, but others are a combination of letters creating a particular sound, i.e. /tʃ/ as in cheese, or /θ/ as in thing.
- Syllable: A part of a word which only has one vowel sound. e.g. son has one syllable, while father has two.
The following books have been invaluable to me for teaching pronunciation:
Underhill, A (1994) Sound Foundations, Macmillan
Bowen, T and Marks, J (1992) The Pronunciation Book, Pilgrims Longman Resource Books
Hewings, M (1993) Pronunciation Tasks, CUP
Pronunciation matters

A series of articles by Adrian Tennant discussing the importance of teaching pronunciation, the issues surrounding the teaching of pronunciation and lots of practical ideas for successfully integrating pronunciation into your lessons.
- 1
- 2
- 3
 Currently
reading
Currently
reading
Pronunciation matters: Using the phonemic chart
- 5


No comments yet